Beware of counterfeits: How to distinguish real cards from fakes.
Old School Antifraud Guide:
How to Spot Fake Magic Cards Under the Lens
The Magic: The Gathering Old School (93/94) market is experiencing an extraordinary era. Legendary cards from iconic editions like Alpha, Beta, and Arabian Nights have now reached astronomical prices, attracting the attention of collectors from around the world and, unfortunately, also of increasingly sophisticated counterfeiters. While modern reproductions (proxies) can be deceiving to the naked eye, the physics and industrial processes used by Wizards of the Coast in 1993 and 1994 have left imprints that are impossible to perfectly replicate.
1. The Scientific Proof: The Weight Verification
Weight checking is a formidable test because it is completely independent of the card's visual appearance. Counterfeiters almost always use modern commercial cardstock which has a density, consistency, and chemical composition radically different from the original cardstock of the 1990s. Today's reproductions often contain plasticized inner layers or heavy cores (black cores) to simulate the rigidity of real cards, but this ultimately alters their mass.
Card Type / Status
Expected Weight Range
Original vintage card (Standard / Mint)
1.74 g - 1.76 g (Total range 1.70 g - 1.80 g)
Original card very worn (Heavily Played / Poor)
1.68 g - 1.71 g (Fiber loss from rubbing)
Common Fakes / Modern Proxies / Re-backed Cards
Above 1.85 g (Up to above 1.95 g due to glue or black core)
What to look for in weight abnormalities:
- Cards that are too heavy (Above 1.82 g - 1.85 g): Often indicate the use of modern commercial stock that is too dense, or the presence of additional layers of glue (as in the case of re-backed cards, where a counterfeit face is glued to the back of an authentic basic land).
- Cards that are too light (under 1.65 g): Often caused by cheap prints made on cardboard without an internal core or with insufficient density.
Please note: Weight alone isn't enough to establish absolute authenticity (there are excellent fakes that fall within the correct weight), but it's an excellent initial screening tool. If a card weighs 1.90 g or 1.60 g, you can reject it immediately.
2. The King of Optical Checks: The Green Dot Test
The backs of Magic cards have remained largely unchanged since 1993. This has allowed us to identify a universal security marker located in the green circle of the color wheel on the card back. Grab your magnifying glass (at least 30x) and examine the green dot closely.
What a genuine card should look like:
- The "L" constellation: within the light, shaded area of the green dot, four small red dots arranged in the shape of an upside-down letter "L" must be clearly visible.
- The clear division of the black border: The outer black circle enclosing the green dot should be composed of solid lines and not a confusing grid of printed pixels or dots.
What you find in fakes:
Commercial printers used by counterfeiters reproduce images by combining tiny dots of mixed colors (cyan, magenta, yellow, and black). Under the magnifying glass, the green circle of a counterfeit card will appear muddy, missing the four clear red dots, or completely covered in a chaotic shower of microscopic red and black dots scattered throughout in no particular order.
3. The Millimetric Detail: The 'Sawtooth' on the Letter T
Staying on the back of the card, move your magnifying glass over the word "DECKMASTER" or, even better, the word "The" contained in the main "Magic The Gathering" logo.
The T and h test (The):
If you look at the letter "T" in the word "The," you'll notice that the typeface lacks smooth, linear edges. In the original 1993 printing, the edges of the "T" show a distinctive serration (a sawtooth pattern) reminiscent of the teeth of a saw. Moving on to the letter "h," authentic cards also show three small black dots inside the letter. Forgers, scanning and reprinting the image of the back, tend to lose this microscopic resolution: under the magnifying glass, the letters of fakes appear blurry, excessively smooth, or blended with the background color, and the three dots in the "h" are missing or muddled.
4. Examining the Layers: The Rosette Grid and Black Text
In the original 1993 printing presses, the printing process involved separate steps. The colored background and illustrations were printed using a technique that creates a distinctive geometric pattern of colored dots, called a rosette pattern. The black text and mana symbols were then printed over the rosette using a solid, pure black ink.
Under a microscope, the black text should appear perfectly sharp, continuous, and positioned "above" the grid of colored dots (the rosette pattern) of the background. In modern forgeries printed in a single block, the black text is instead grainy and composed of small colored dots fused together.
The acid test on the card front:
- Solid text: Place the magnifying glass over the text on a card. On authentic cards, the black letters should appear perfectly clear, solid, and sharp. The colored dot pattern should not be visible beneath the letters.
- Defined mana symbols: The black circle and the black mana skull, as well as the water drop or the sun, must have solid black outlines.
If you notice that the black text is made up of a cluster of microscopic colored dots or that the edges of the text are grainy and pixelated, you are almost certainly dealing with a fake printed in a single digital pass.
5. The Light Transmission Test
For newer edition cards, the light test is no longer considered a surefire or definitive method for distinguishing real Magic: The Gathering (MTG) cards from fake ones, but the situation is completely different for vintage cards: for the latter, the light test is still very useful, but it is mainly used for a different and very specific reason: to unmask re-backed cards.
This test doesn't require a lens, but a very powerful flashlight (a smartphone flashlight is perfect) and a dark room. The original cardstock used by Wizards has a three-layer internal structure: two outer layers of white paper and a central adhesive core of a bright blue color (blue core). This blue layer serves to give rigidity to the card and prevent it from being completely transparent.
How to proceed:
1. Shine your smartphone flashlight directly on the back of the card.
2. Look at the front of the card.
3. On a real card, the light will pass through the card evenly, revealing a sharp tone and preserving the visibility of the design details on the front.
4. On fakes, which often use thick, stiff commercial cardstock (such as black core or cardstock without a colored core), the light will struggle to pass through, making the card almost completely opaque, or it will filter through, revealing an unattractive yellowish or marbled color.
How they fail the light test: since a re-back is made of two halves glued together, the layer of glue and the double thickness block a lot of light. If you hold the flashlight behind the card, the light will barely pass through, appearing unevenly (patchy / chunky), and you may even see writing or internal shadows.
A re-back is a sophisticated counterfeit in which scammers take a Collector's Edition (CE/IE) card, which has the same front as a valuable Alpha or Beta card but square corners and a gold-bordered back, scrape off the back, and glue on the back removed from a low-value original card.
The genuine card: an authentic, unaltered Old School card, lit from behind, lets through a good amount of fairly even light with a bluish glow caused by the blue core. You can make out the wavy texture of the inner layer and, faintly, the artwork on the front. On 93/94 cards the light may look slightly cloudy, with lighter and darker areas caused by the printing differences of the time: this is why the comparison should always be made against a card of the same set that you know for certain is authentic.
6. Thickness: Standard sizes and "Blue Core" cardboard
An authentic Old School Magic card has a very precise standard thickness, between 0.30 mm and 0.32 mm.
This thickness is the result of a "sandwich" structure composed of three layers:
- Printed front (white paper)
- Blue core (blue Core, a layer of opacifying glue/graphite in a blue-light blue color that serves to give elasticity and to prevent the cards from being seen through during play)
- Printed back (white paper)
Many recently printed counterfeits on cheap cardstock fail to find the perfect balance. They often use single sheets (without an internal core), resulting in them being too thin, flexible, and lightweight, or they use a black core, which makes the card slightly thicker but with a completely different stiffness (the card "springs" incorrectly when bent slightly).
On the contrary, a re-back or a gross fake may feel stiffer, or slightly thicker than normal (remember that the correct thickness of a real card is approximately 0.30 - 0.32 mm).
Conclusions: Create your own reference archive
The best way to protect yourself from Old School scams is to train your eye. Take a common basic land or a low-value card you're absolutely sure of (from the same era or older sets) and use it as a comparison. Compare the back, the exact weight on the scale, the feel of the cardstock, the smell, and the way it reacts to light under the magnifying glass with the valuable card you intend to purchase.
The combination of weight verification and microscopic details on the back (Green Dot and Sawtooth T) guarantees almost absolute purchase certainty. Before investing large sums on portals or private markets, always perform these measurements by comparing the piece with a guaranteed authentic basic land from the same set.
If a deal seems too good to be true, especially when it comes to Power Nine or premium 93/94 pieces, always exercise extreme caution and ask for detailed macro photos before proceeding with payment.
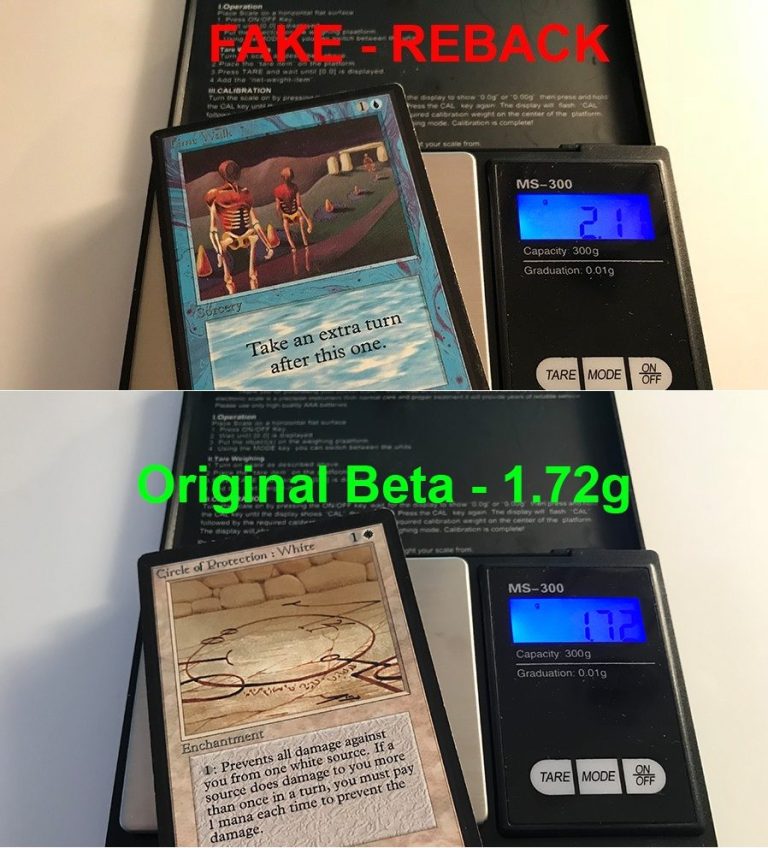
Figure 1: Comparison between real weight and that of a re-backed card
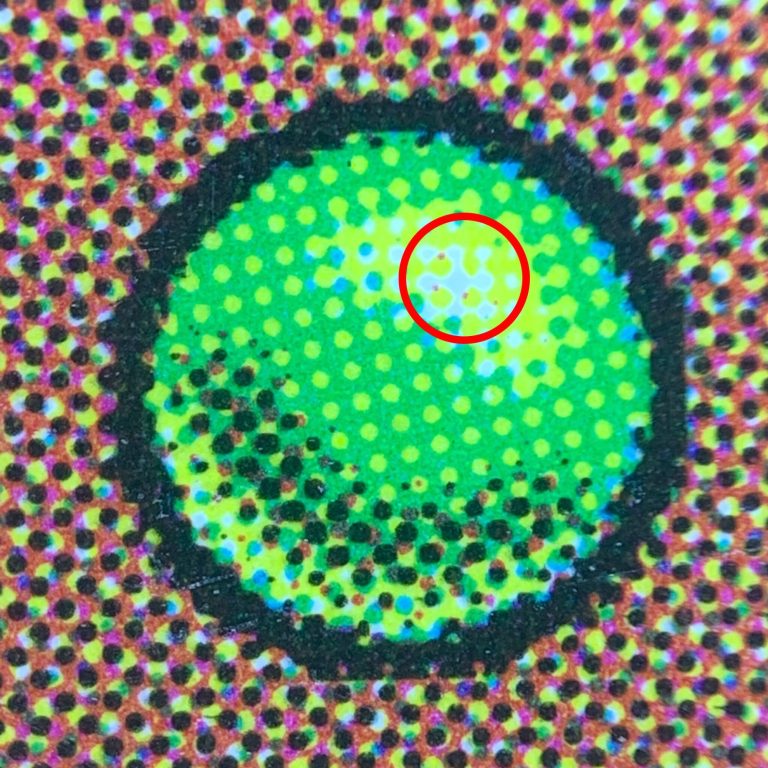
Figure 2: Diagram of the Green Dot Test on an authentic card, with the 4 red dots arranged in an 'L' shape
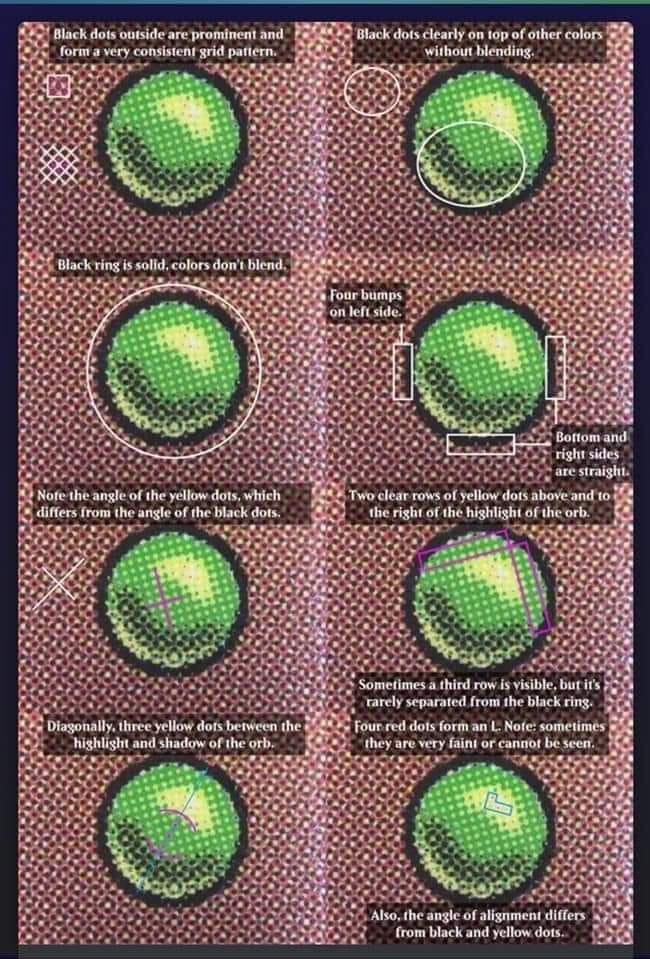
Figure 3: Green Dot Test diagrams on an authentic card, with all the points to check
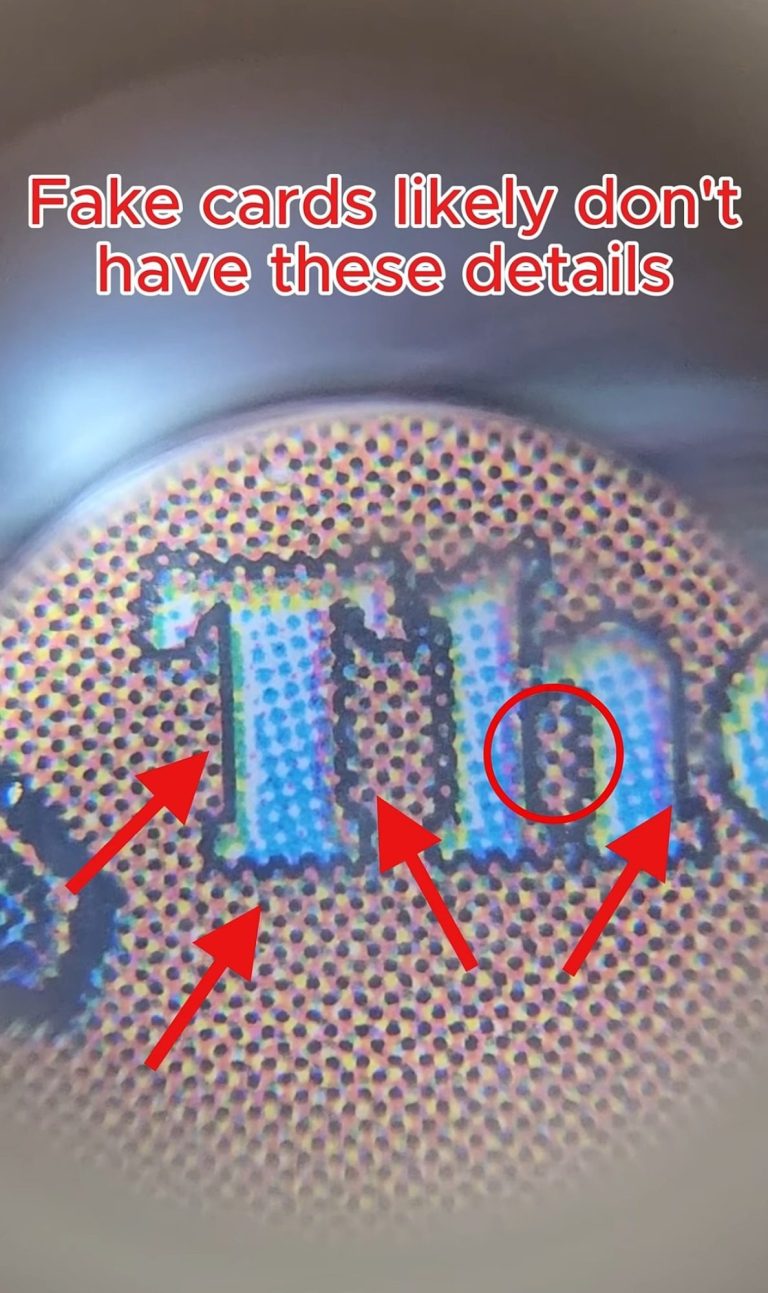
Figure 4: Microscopic detail of an authentic card, with the sawtooth serration on the T and three black dots in the h (photo: Draconic TCG)
Video: how to check a card step by step
In this video you can see all the checks described above, step by step.